Work Orders Management
The Work Orders module in our Facilities Management app helps manage, track, and complete maintenance tasks efficiently. This guide walks you through the main sections and key attributes visible in the Work Order screen.
Work Order Lifecycle
The following diagram shows the various stages in the work order workflow:
Work Order Status Description
Below is a breakdown of each Work Order status and its meaning within the system.
| Status | Description |
|---|---|
| New | A newly created Work Order that has not yet been scheduled or assigned. Typically awaiting review. |
| Scheduled | The Work Order has been planned with a start date, assigned to a team or supplier, and is ready to commence. |
| In Progress | Work has started on the task. This status shows that execution is underway but not yet completed. |
| On Hold | The Work Order has been temporarily paused. This may be due to awaiting parts, approvals, or external factors. |
| Completed | All tasks associated with the Work Order have been finished, and no further work is required. |
| Invoiced | The Work Order has been billed, and an invoice has been issued to the client or stakeholder. |
Work Orders Dashboard
The Work Orders Dashboard provides a centralized view of all work orders in the system. At the top, status tiles display the total number of work orders in each stage, offering quick insights into your work orders pipeline. This dashboard helps streamline work order management and track progress at a glance.
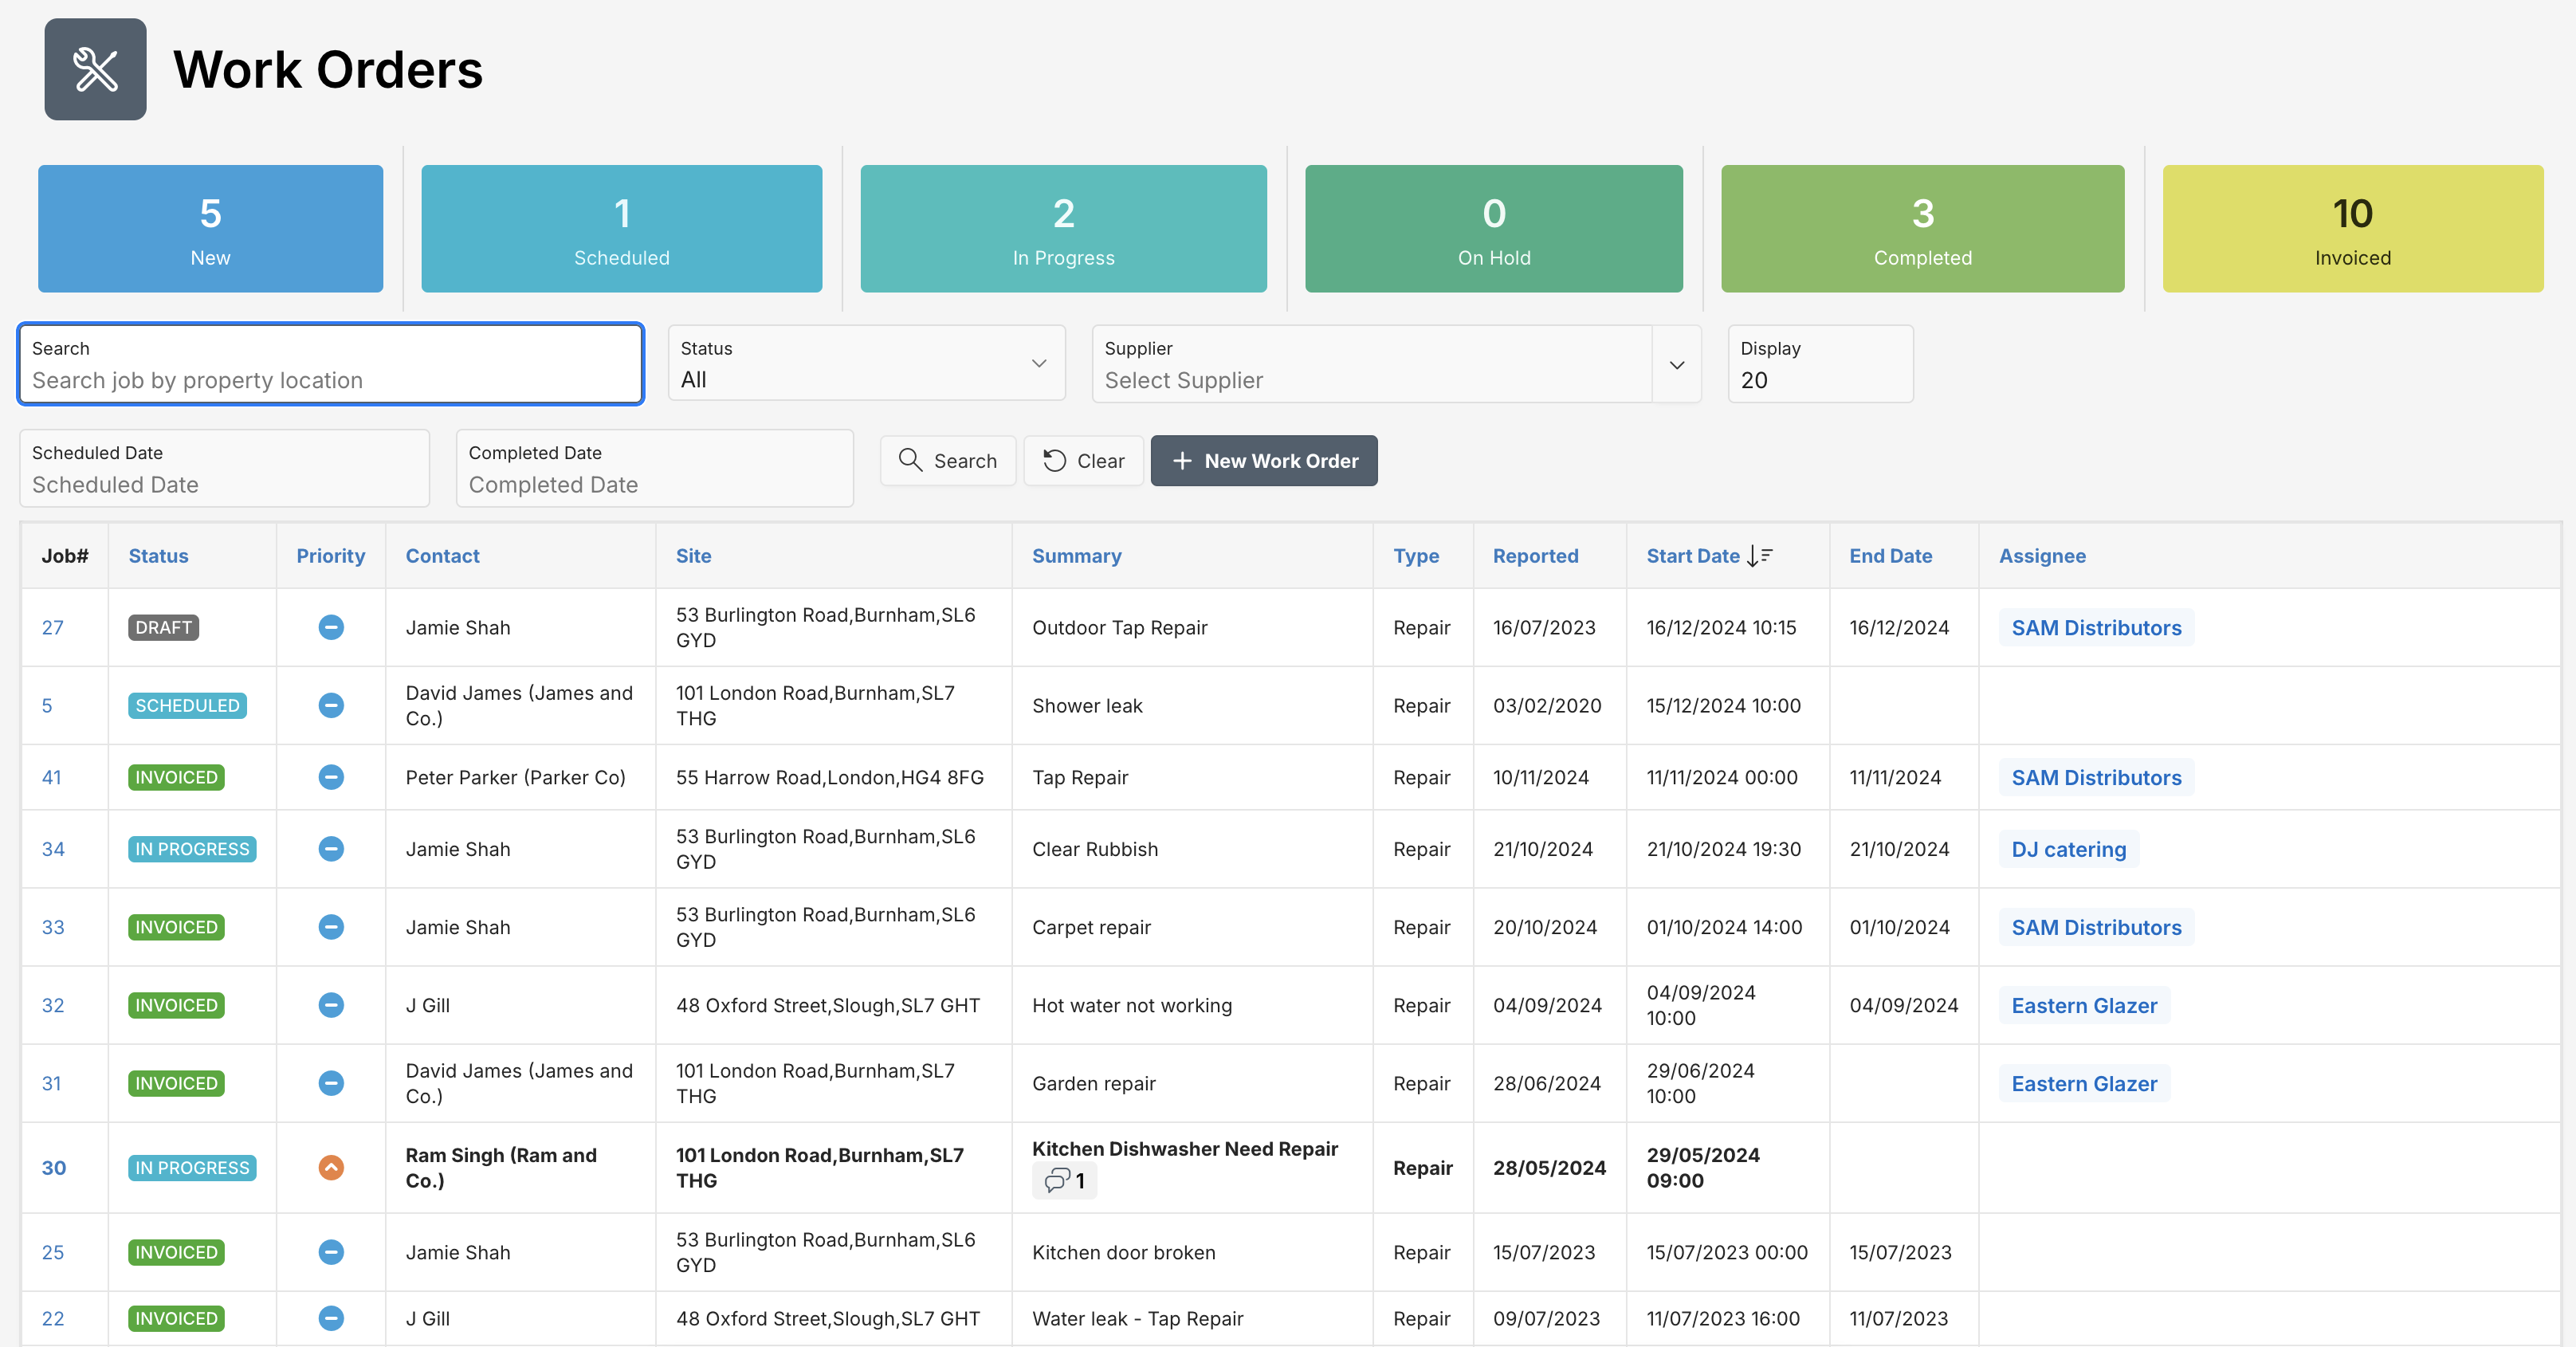
The Work Orders dashboard gives a summarized view:
- Job numbers, status, priorities, service contacts, and sites.
- Quick view into New, Scheduled, In Progress, Completed, and Invoiced jobs.
- Search and filter jobs by property location, status, and supplier.
Work Order Creation & Editing
To add a new Work Order, click at New Work Order button. To create or edit a work order, you’ll enter the following information:
Fields Overview
You must fill in required fields, marked with a red asterisk (*).
| Attribute | Description |
|---|---|
| Job# | Unique identifier for the Work Order. This is automatically generated by the system. |
| Status | Current state of the Work Order (e.g., New, Scheduled, In Progress, On Hold, Completed, Invoiced). |
| Priority Level | Urgency of the job: Low, Medium, or High. |
| Reported Date | Date and time the issue was reported. |
| Type | Nature of the job (e.g., Complaint, Compliance, Handover, Handback, Repair, Inspection). |
| Service Contact | Main point of contact for the service. |
| Billing Contact | Contact responsible for billing. |
| Summary | Short description of the Work Order. |
| Service Location | Address where the service is to be performed. |
| Billing Address | Address where invoices are to be sent. |
| Description | Detailed description of the work needed. |
| Planned Start Date | Scheduled date and time to begin work. |
| Planned End Date | Scheduled date and time to end work. |
| Actual Start Date | Actual start date and time of the job (filled later). |
| Actual End Date | Actual end date and time of the job (filled later). |
| Actual Cost | Real cost incurred for completing the job. |
| Billable Cost | Cost billed to the client. |
Work Order Information
Each Work Order goes through different tabs, allowing full control over Tasks, Costs, Invoices, Documents, Comments, and Activity.
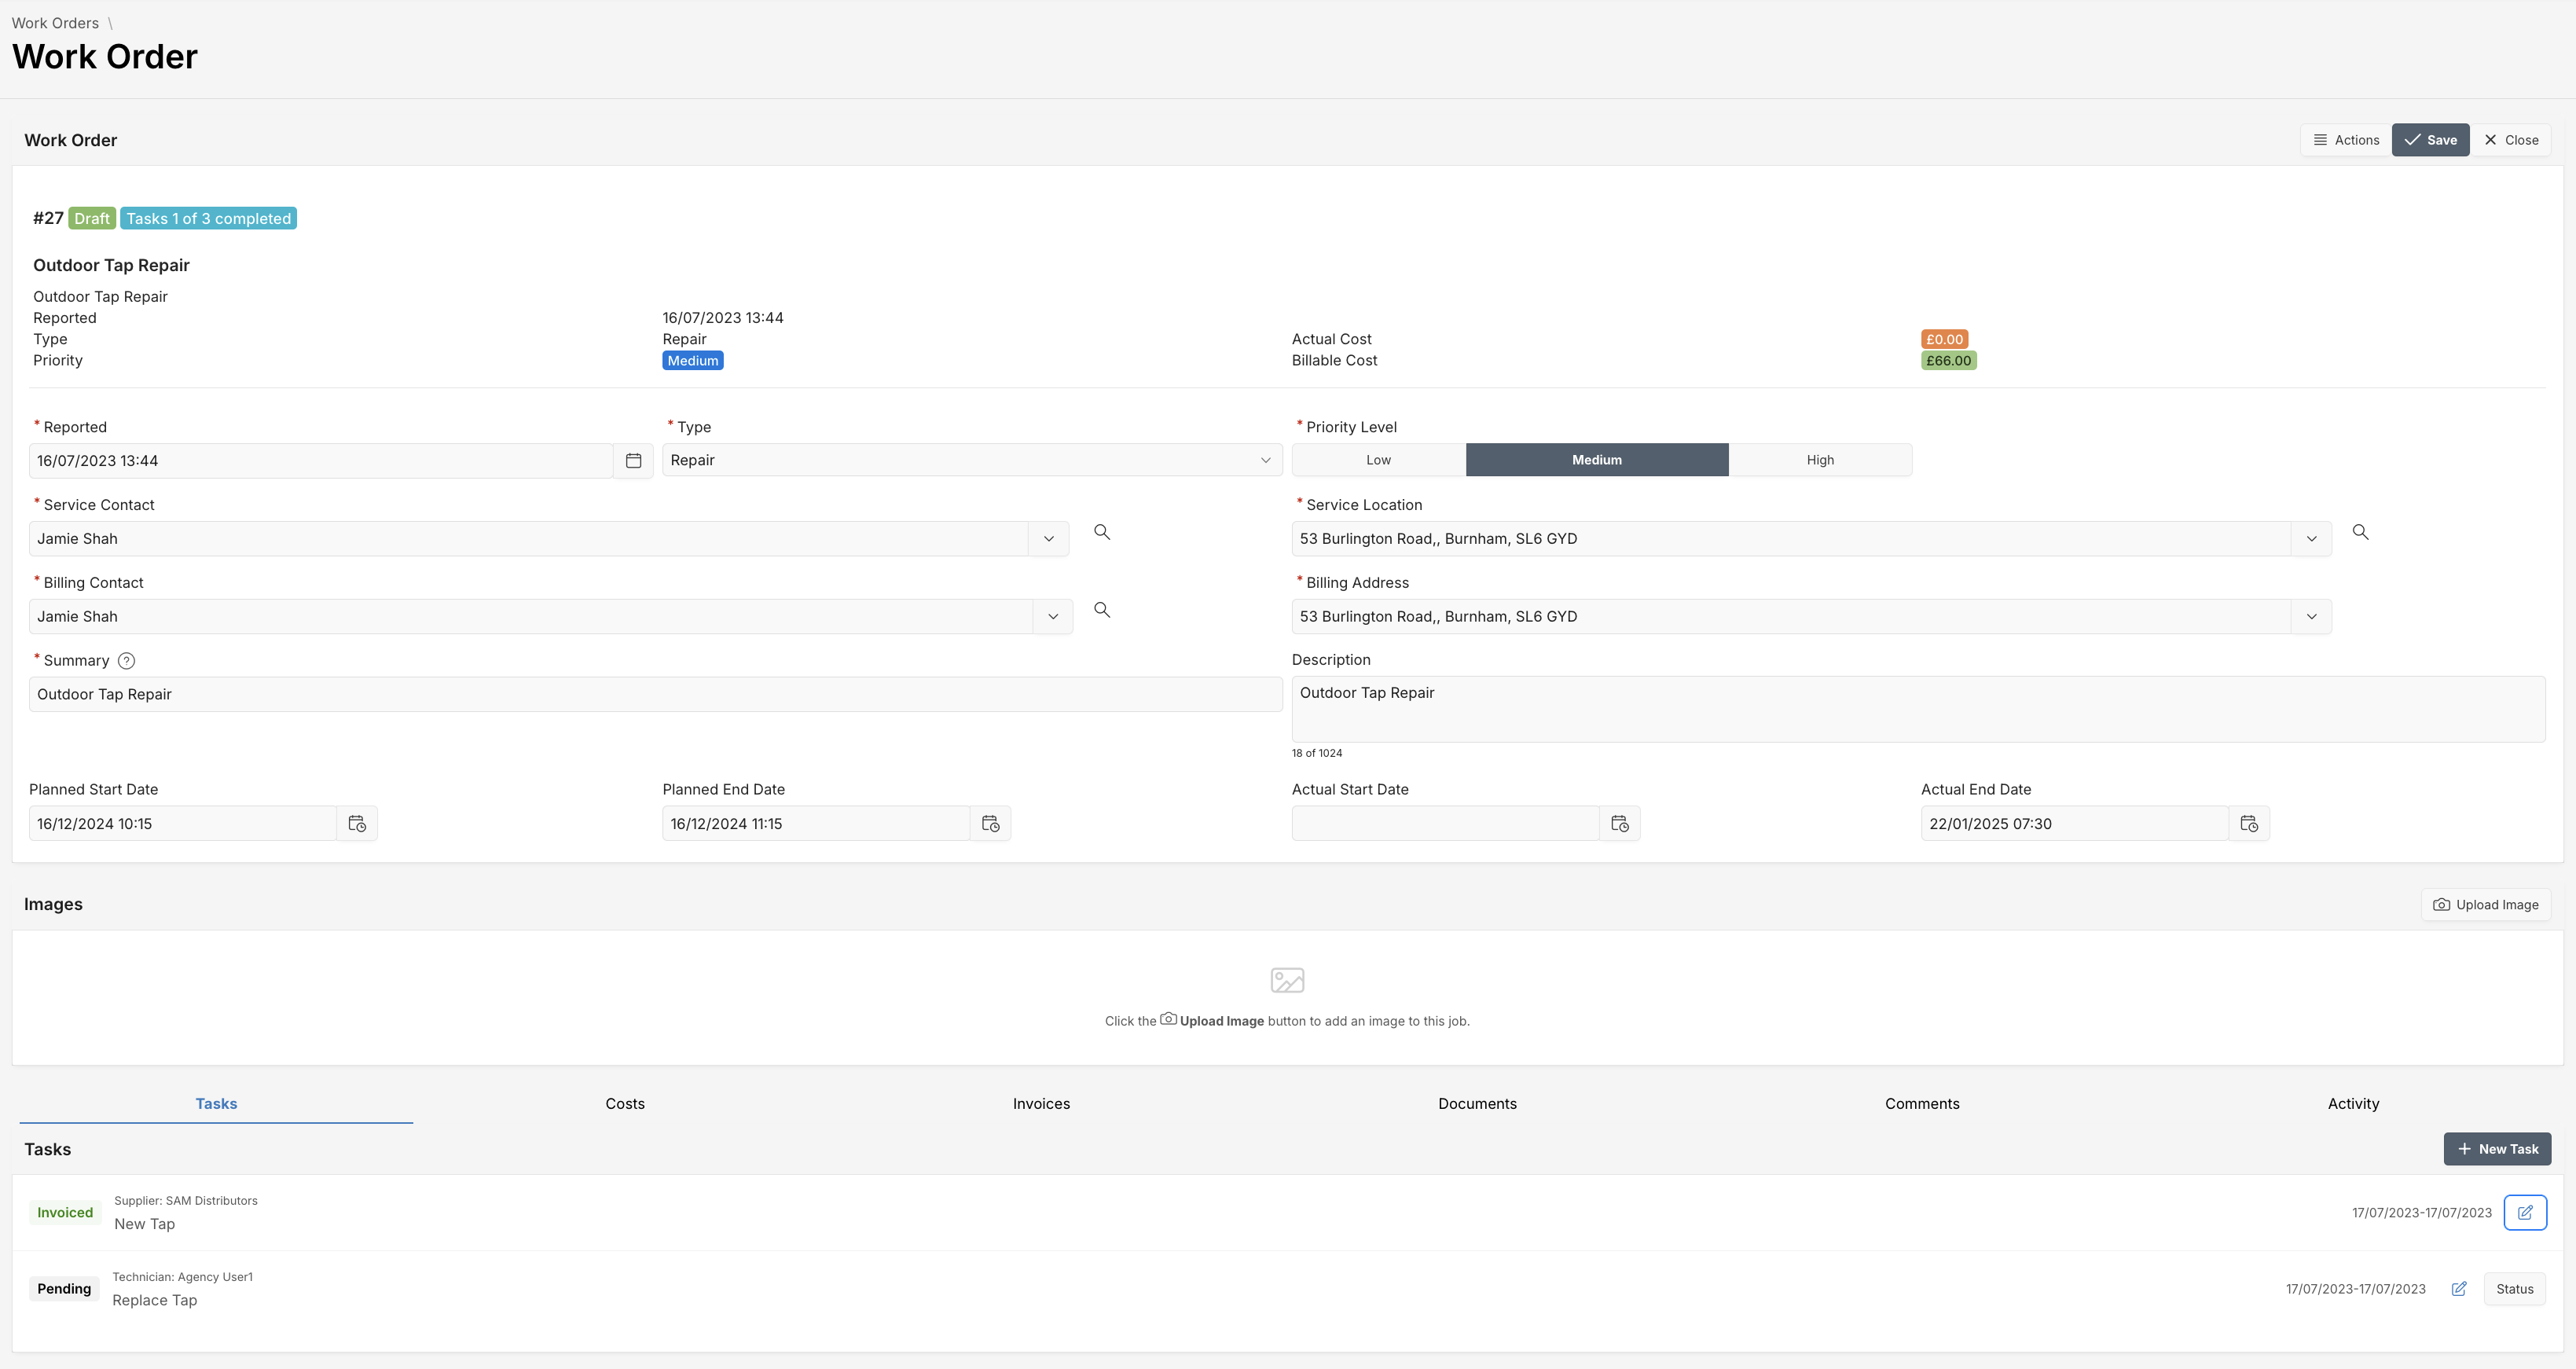
Images
Attach visual evidence or supporting photos:
- Supports drag-and-drop for image uploads.
- Images can be linked to specific tasks (optional).
Upload Image: Click Upload Image and add a photo with an optional description.
Tasks
Manage and assign specific tasks under the Work Order:
- Task Name
- Status (Pending, Invoiced, Completed)
- Supplier and Technician/User
- Start Date and End Date
- Quantity and Unit
Add New Task: Click + New Task to create task lines.
Costs
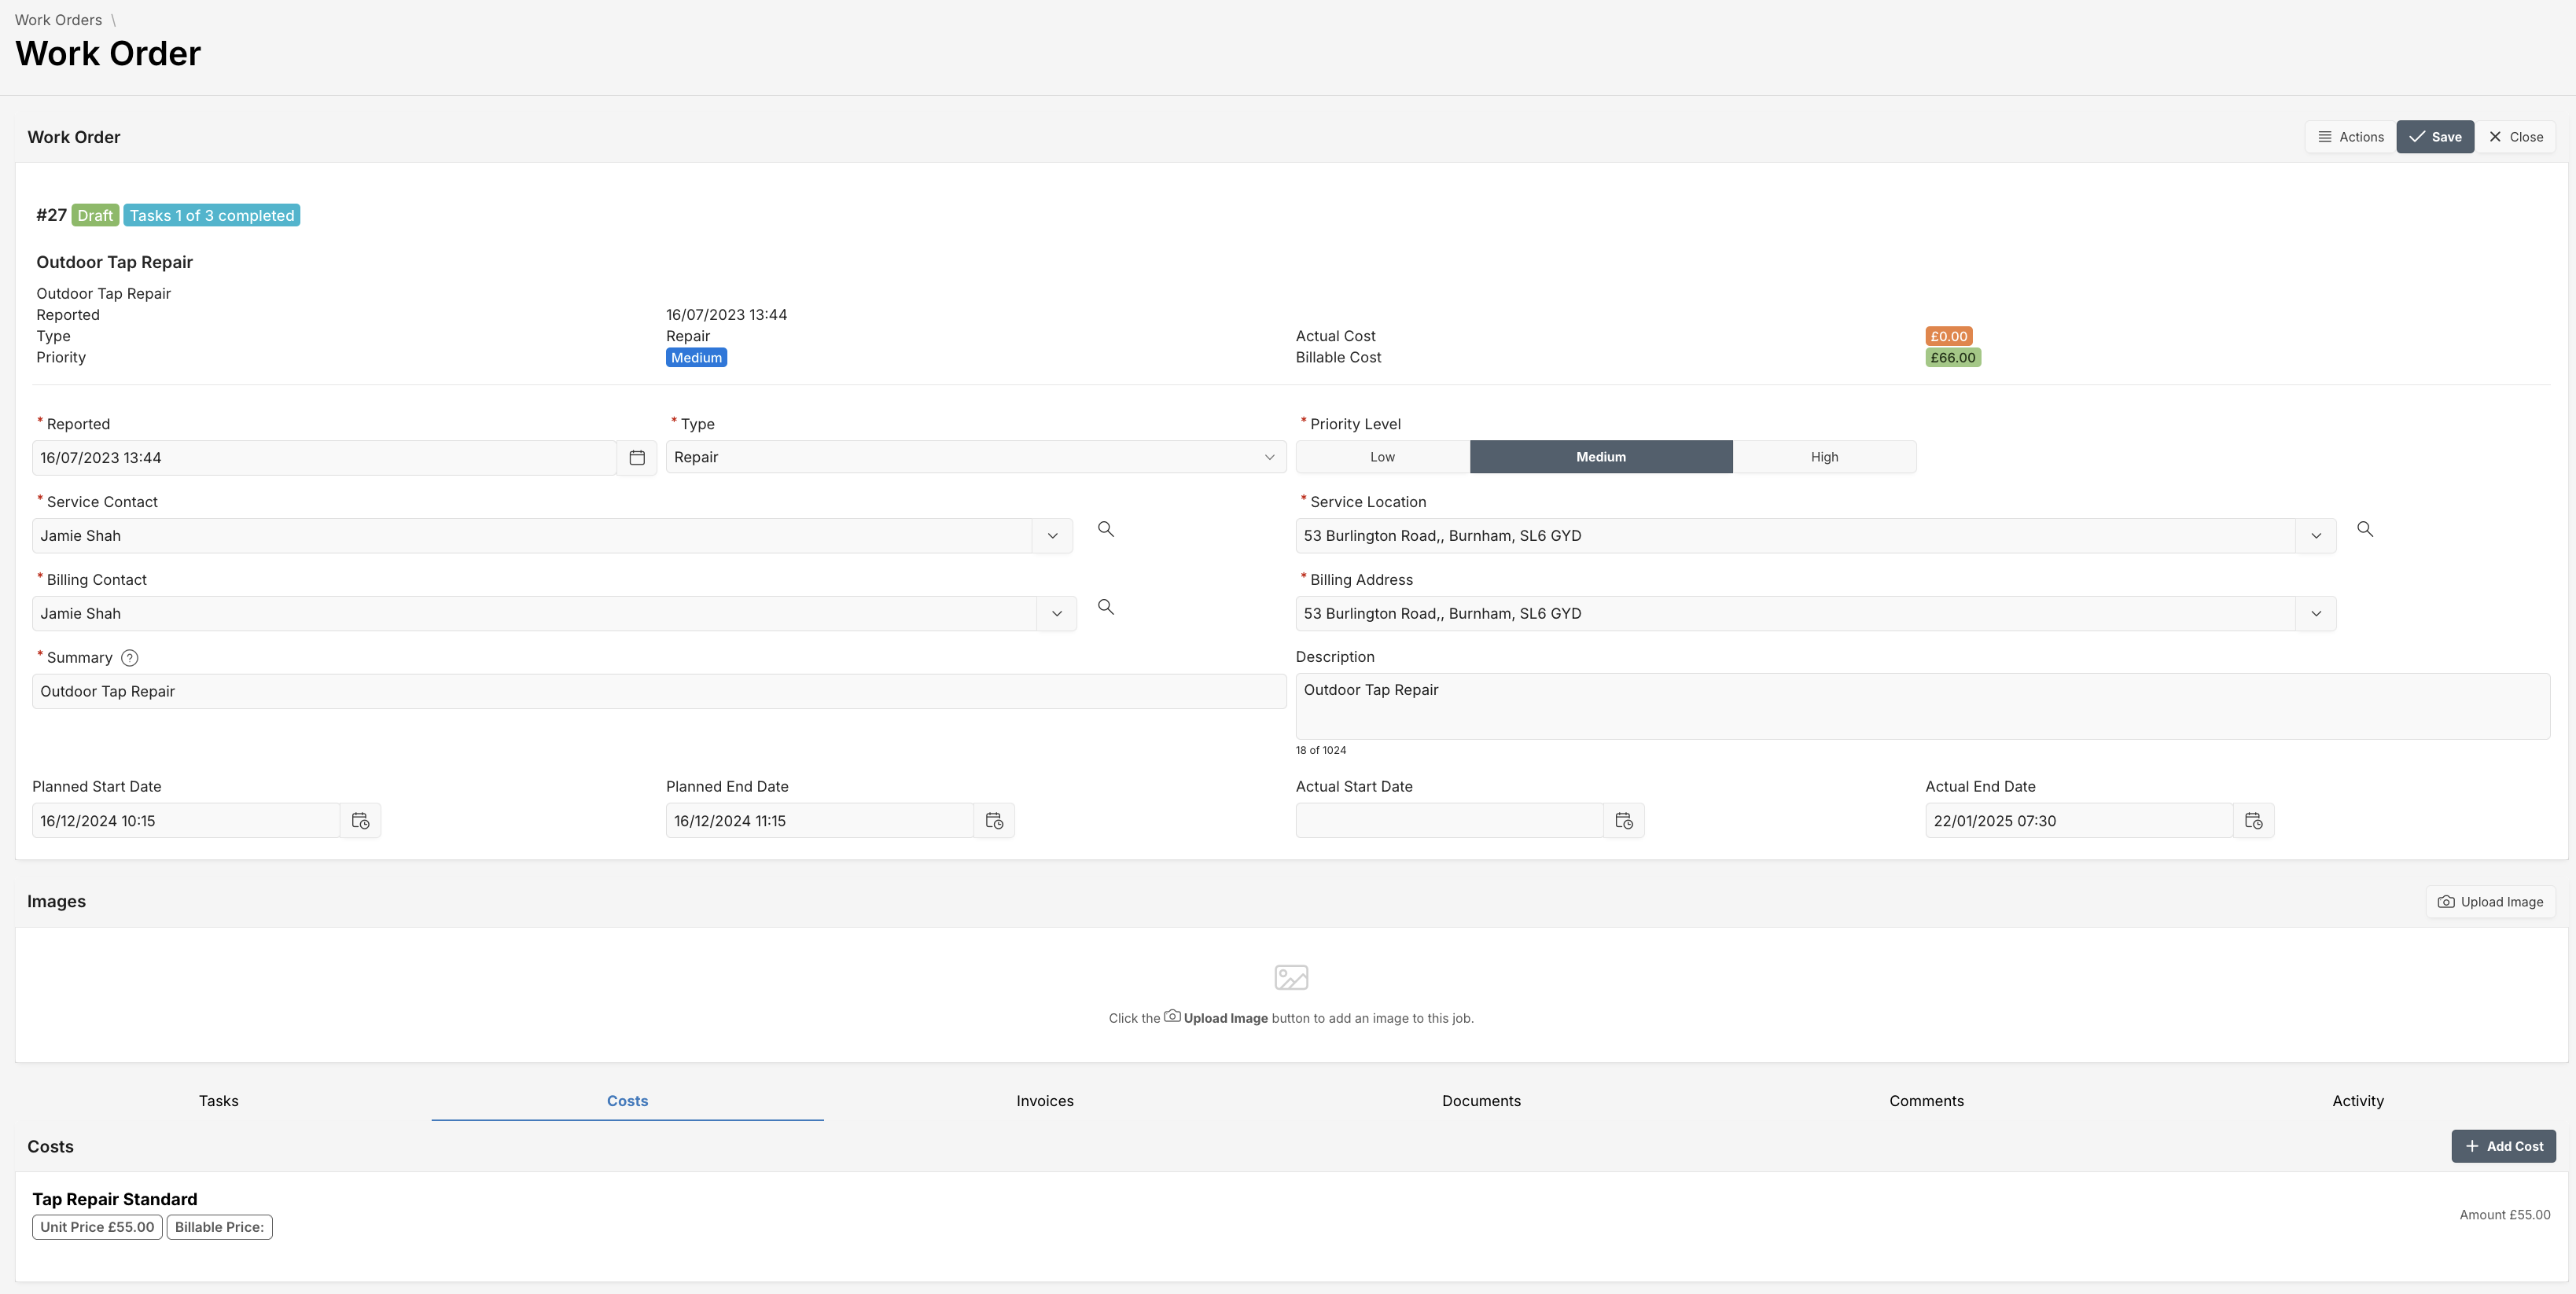
Costs tab enables tracking of cost elements associated with the Work Order. Click at the the Cost Line to edit or click + Add Cost and fill out the Work Order Line form with following information:
- Work Order Task: Select the Task associated with the cost (if applicble)
- Item: The service or material provided.
- Quantity: Quantity of item(s)
- Unit: Unit of measurement
- Unit Price: Cost per unit.
- Tax Rate and Tax Amount
- Billable Price: Amount charged to the client.
- Price Uplift % (if applicable)
Invoices
Manage invoices linked to the Work Order.
- Invoice ID and linked Supplier/Client
- Amount billed
- Status (Paid or Pending)
- Allocation % if partial payments exist
Documents
You can upload supporting files via Upload Document:
- Select document type
- Drag and drop or browse files (Allowed document types - PDF, Word, Excel; max document size 15MB)
Work Order Actions
- Save: Click to save any updates.
- Close: Exit without saving.
- Actions: Work Orders provide Actions menu that allows users to perform additional operations such as status updates, communication, and document preview. Below is a description of each available action.
| Action | Description |
|---|---|
| Preview | Generates a PDF preview of the current Work Order for review or sharing. |
| Send SMS | (Visible only when Scheduled) Sends an SMS notification to assigned technicians or suppliers about the Work Order details. |
| Scheduled | Updates the Work Order status to Scheduled once planning is complete and a start date is assigned. |
| In Progress | Updates the Work Order status to In Progress when work has officially started. |
| Completed | Marks the Work Order as Completed after all tasks have been finished. |
| On Hold | Sets the Work Order status to On Hold if work needs to be paused temporarily (e.g., waiting on parts, approvals). |
Actions Visibility
The following table outlines when specific actions are visible based on the current status of the Work Order.
| Action | New | Scheduled | In Progress | On Hold | Completed | Invoiced |
|---|---|---|---|---|---|---|
| Preview | ||||||
| Send SMS | ||||||
| Scheduled | ||||||
| In Progress | ||||||
| Completed | ||||||
| On Hold |
Key
Action is available.
Status Transition Flow
Below is a visual flow of how Work Order status can change based on available actions.
New
 ├──> [Scheduled] (via "Scheduled" action)
 └──> [In Progress] (via "In Progress" action)

Scheduled
 ├──> [In Progress] (via "In Progress" action)
 ├──> [Completed] (via "Completed" action)
 ├──> [On Hold] (via "On Hold" action)
 └──> [Send SMS] (available at Scheduled stage)

In Progress
 ├──> [Completed] (via "Completed" action)
 └──> [On Hold] (via "On Hold" action)

On Hold
 └──> [In Progress] (via "In Progress" action)

Completed
 └──> [Invoiced] (after invoice is created)
Some actions like Send SMS are conditional and appear only when the Work Order is in a Scheduled state.
Tip: Always Save the Work Order after performing an action to ensure the status or operation is recorded properly!
Add Bill / Expense
The Add Bill / Expense feature allows users to record expenses and supplier invoices related to a Work Order.
This ensures that all material, labor, and third-party costs are accurately tracked and managed in the Work Order.
When an expense is logged, a Cost Line is automatically created under the Work Order, improving financial visibility.
Fields Overview
You must fill in required fields, marked with a red asterisk (*).
| Attribute | Description |
|---|---|
| Supplier | Select the Supplier or Contractor who is submitting the bill or invoice. |
| Attachment | Upload a file copy of the invoice or bill (e.g., PDF, Image). |
| Invoice Receipt Date | Date when the invoice was physically or digitally received. |
| Invoice Date | The actual date mentioned on the supplier’s invoice. |
| Invoice Reference | Supplier’s invoice number for internal/external tracking. |
| Payment Method | Method by which payment will be made (e.g., BACS, Cheque, Card). |
| Payment Term | Payment term days (e.g., 30, 45) — defines due date from the invoice date. |
| Payment Due Date | Calculated or manually entered date by when payment must be made. |
| Expense Type | Choose the appropriate expense account for allocating this expense in your accounting system. |
| Description | Optional notes or details about the expense for internal records. |
| Invoice Amount | Total amount billed, inclusive of taxes if applicable. |
| Tax Rate | Applicable tax rate (e.g., 0%, 5%, 20%). |
| Tax | Amount of tax calculated based on Invoice Amount and Tax Rate. |
| Net Amount | Invoice Amount minus Tax — automatically calculated. |
How to Add a Bill / Expense
- Click Actions → Add Expense inside the Work Order.
- Select the appropriate Supplier.
- Attach the supporting invoice file (optional but recommended).
- Fill in the invoice details, including payment terms and due date.
- Enter the Invoice Amount and select the correct Tax Rate.
- Review calculated Tax and Net Amount.
- Click Save to record the expense and create a corresponding Cost Line.
Important Notes
- Expenses without an attachment can still be saved, but uploading proof is highly recommended.
- Only suppliers already linked to the Work Order can be selected.
- Every added expense will contribute to the Actual Cost shown in the Work Order.
Tip: Always double-check the Payment Term and Due Date to avoid supplier disputes later.
Create Invoice
The Create Invoice screen allows you to generate an invoice by selecting the relevant payee, billing details, cost allocation, and sales account.
Fields Overview
You must fill in required fields, marked with a red asterisk (*).
| Attribute | Description |
|---|---|
| Payee | Select the contact who will pay the invoice. |
| Billing Address | Select the billing address of the payee. |
| Sales Account | Choose the appropriate sales account for allocating this invoice in your accounting system. |
| Work Order Line(s) | Displays the list of billable tasks associated with the Work Order. Only completed and logged lines are available for billing. |
| Total Billable Cost | Shows the total cost that can be billed based on the Work Order lines. |
| Cost Allocation % | Enter the percentage of the Work Order’s total billable cost to allocate to this invoice (between 1% and 100%). |
| Invoice Amount | Automatically calculated based on the Cost Allocation percentage and Total Billable Cost. |
** How to create an Invoice
-
Complete All Tasks
Ensure all assigned tasks in the Work Order are marked as completed. -
Log All Costs
Verify that all material, labor, and other costs have been added to the Work Order. -
Navigate to Create Invoice
Click Actions → Create Invoice on the Work Order page. -
Fill in Invoice Details
- Select the Payee.
- Enter or confirm the Billing Address.
- Select a Sales Account.
- Specify the Cost Allocation % (if partial billing is needed).
-
Review the Invoice Amount
Ensure the Invoice Amount looks correct. -
Click Create Invoice
Hit Create Invoice to generate and save the invoice.
Important Notes
- Only completed and cost-logged tasks are available for invoicing.
- You can split billable costs between multiple payees by allocating partial percentages using Cost Allocation %.
- Invoices must be linked to a valid Sales Account for financial tracking.
Tip: Always double-check the Total Billable Cost before creating the invoice to avoid discrepancies later.
Work Order Workflow
Work Order Workflow Highlights
- New Work Order is created and prepared for scheduling.
- Scheduled once start dates, technicians, or suppliers are assigned.
- In Progress when tasks are actively being worked on.
- On Hold available at any point to pause and resume work later.
- Completed after all tasks, costs, and validations are finished.
- Add Bill/Expense to capture real costs and create Cost Lines.
- Invoice Created to bill customers or process supplier payments.
- Invoice Paid marks full financial closure of the Work Order.
Tip: Keep your Work Order updated in real-time to maintain accurate costs and project timelines.