Invoices
Manage property-related billing and financial records through the Invoice section of the Accounts module.
The Invoice section in the Accounts module allows property managers, facility administrators, and finance teams to track, generate, and manage invoices related to leases, maintenance services, utilities, vendor contracts, and other property-related transactions.
This section ensures that all income and billing activities are organized and easily accessible, supporting accurate financial reporting and tenant accountability.
Key Features
- Invoice Generation: Create invoices manually or from linked modules such as Quotes, Work Orders, or Contracts / Lease Agreements.
- Client & Vendor Billing: Issue invoices to tenants, owners, or third-party vendors with full details on services rendered or charges applied.
- Recurring Invoices: Automate invoicing for periodic charges like rent, maintenance fees, or service contracts.
- Invoice Tracking: View invoice status (e.g.,
Draft,Approved,Paid,Overdue), filter by property, unit, or contact. - Download & Share: Export invoices as PDFs or email directly to recipients from the platform.
Ensure customer and property details are up to date to avoid invoice delivery issues.
Invoices Dashboard
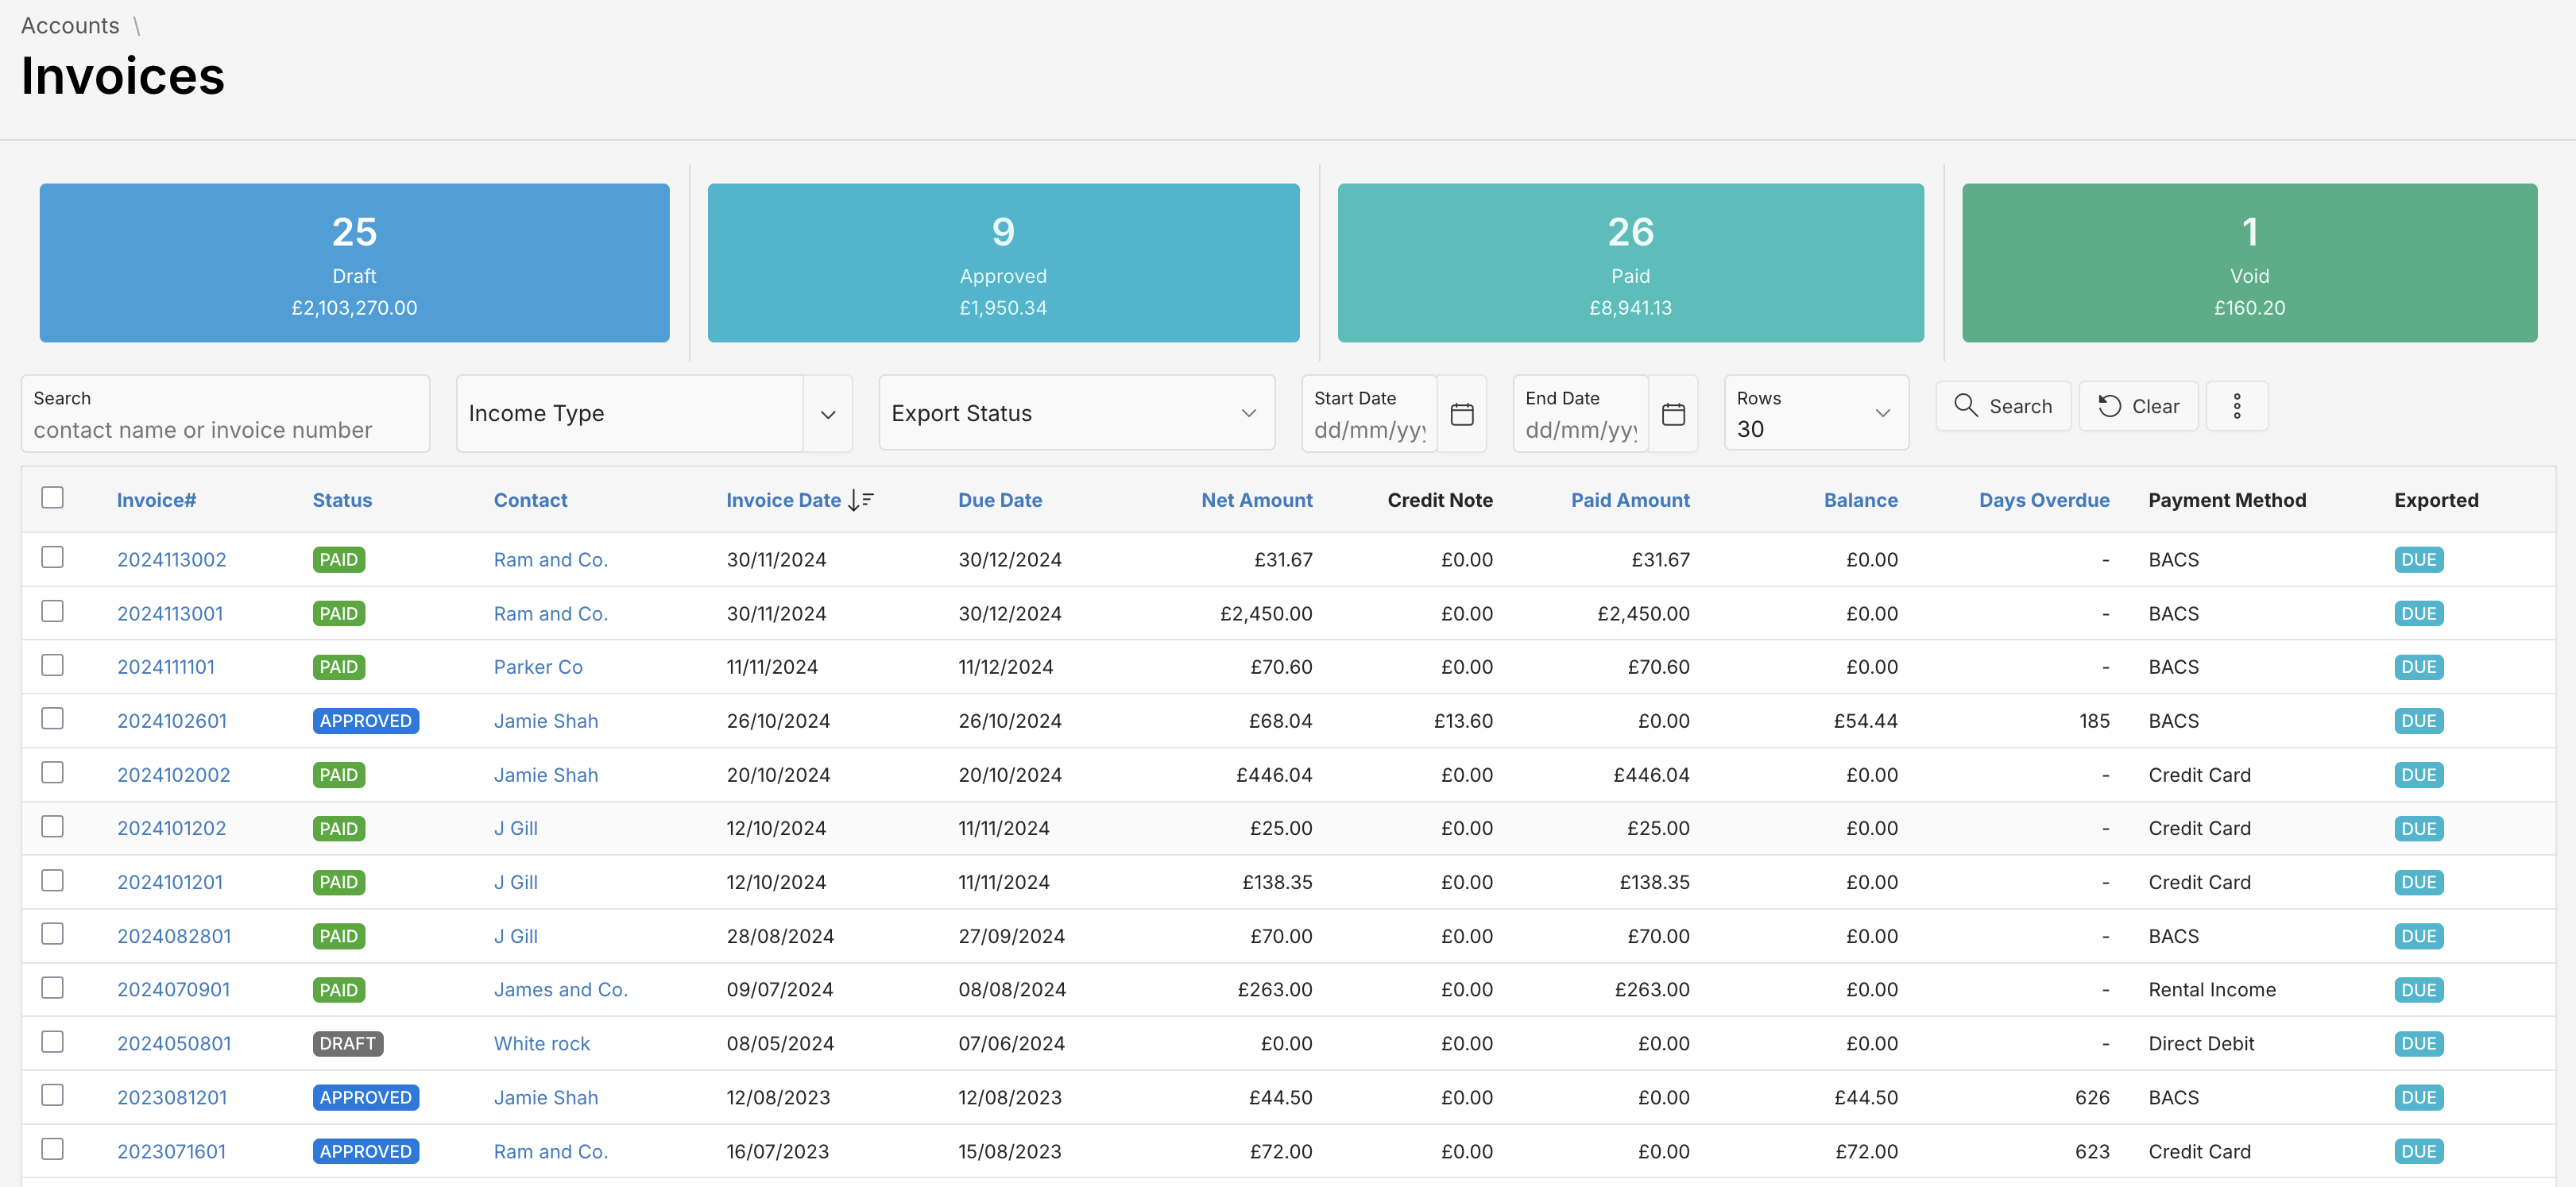
The Invoices Dashboard provides a centralized view of all invoices in the system. At the top, status tiles display the total number of invoices in each stage, offering quick insights into your expenses pipeline. This dashboard helps streamline expense management and track progress at a glance.
Usage Tips
- Search Invoices: Use the search bar to quickly find invoices by customer name or invoice number.
- View Invoices List: Scroll down to see a detailed list of all invoices with sortable columns, including key information such as status, customer, due date, invoice amount and export status.
- Filter Search Results: Use the search filters to refine search results for an Income Type, Invoice Export Status and Invoice date range.
- Create New Invoices: Click the button and select New Invoice option to create a new invoice.
- Edit Invoice: Click at invoice number to edit the invoice.
Status Description
| Status | Description |
|---|---|
| Draft | Invoices created but not yet approved. |
| Approved | Invoices that are ready for payment. |
| Paid | Payment has been made for this Invoice and it has been marked as paid. |
| Void | Cancelled invoices that are excluded from accounting. |
Export Options
From the Invoices Dashboard, you can export invoice data in CSV format using the options available under the Export menu:
- Invoices – Summary - Exports a summary of all issued invoices, including customer details, invoice amounts, due dates, and statuses.
- Invoices – Cash Summary - Exports only cash-based invoices, such as immediate payments and walk-in sales.
To export invoices, click the button, choose Export, and select the appropriate option.
These CSV files are compatible with accounting platforms like Xero (e.g., for import into Xero > Invoices), helping you efficiently sync and reconcile your invoicing data with your accounting system.
Invoice Creation & Editing
To add a new Invoice, click at button and select New Invoice option. To create or edit a invoice, you’ll enter the following information:
Fields Overview
You must fill in required fields, marked with a red asterisk (*).
| Attribute | Description |
|---|---|
| Invoice | System-generated unique invoice reference. |
| Invoice Date | The official date of the invoice. |
| Due Date | When the payment is due from the customer. Due Date is calculated based on Payment Term. |
| Customer | Name of the customer. |
| Billing Address | Billing address of the customer. Filled automatically based on the billing address specified at customer record. |
| Email address of the customer. | |
| Sale Order | Select the corresponding Sale Order, if applicable. |
| Description | General purpose or title of the invoice. |
| Payment Method | Method used to pay the customer (e.g., BACS, Cash, Cheque, Credit Card, Direct Debit, Rental Income). |
| Payment Term | Agreement terms for payment (e.g., Net 30). |
| Tax Mode | Whether tax is applicable. If applicable, is it inclusive or exclusive of the amount. |
Invoice Lines
Each invoice can include multiple items or services listed as invoice lines.
| Attribute | Description |
|---|---|
| Sale Order | Order number for associated Sale Order, if applicable. |
| Rent Journal | Links the invoice line to a specific Rent Journal entry. This is applicable when recording due rent for a under a tenancy agreement. |
| Work Order | References the associated Work Order for delivered goods or services. This ensures traceability between the invoice and operational fulfillment. |
| Item | Name or type of the good/service. |
| Description | Specifics of the work performed or item delivered. |
| Account | Ledger account for revenue categorization. |
| Quantity | Number of items or service units. |
| Unit | Unit of measurement (e.g., Each, Hour). |
| Rate | Cost per unit. |
| Amount | Total before tax |
| Discount | Any line-specific discount applied. |
| Tax Rate | Applicable tax (e.g., 20% VAT). |
| Tax Amount | Calculated tax for the line. |
| Net Amount | Final cost per line after adjustments. |
Invoice Detail View
Each invoice has multiple tabs including Invoice Lines, Notes, Payments, Documents, and Activity. These tabs provide information on associated records for this invoice.
Notes
Use this tab to manage Debit Notes associated with Invoices. Use this area to issue adjustments for overpayments, returns, or invoiceing corrections.
Payments
Track historical payments made against the invoice. The following table describes the payment list columns:
| Column | Description |
|---|---|
| Edit Icon | Allows you to edit the payment entry details, such as amount, date, or method. |
| Status | Indicates the current state of the payment (e.g., Draft, Paid). |
| Payment Date | The date on which the payment was recorded or processed. |
| Amount | The monetary value of the payment applied to the invoice. |
| Payment Method | Specifies how the payment was made (e.g., BACS, Cash, Cheque, Credit Card, Direct Debit, Rental Income). |
Documents
The Documents tab displays all files uploaded to this invoice.
To add supporting documents, click Upload Document. In the upload dialog, you can either drag and drop files or browse to select them manually.
Supported file types: PDF, Word, Excel
Maximum file size: 15 MB
Activity
Displays system-generated logs and interactions related to the invoice lifecycle.
Actions Menu
The Actions menu provides quick access to key operations related to the selected invoice:
-
Preview
The Preview option allows users to view a real-time PDF preview of the selected invoice before taking further action. This helps ensure the invoice appears exactly as intended before sending or printing. -
Edit Invoice
Opens the invoice in edit mode, allowing you to modify invoice details such as items, dates, and amounts. -
New Note
Adds a Credit Note linked to this invoice, typically used for adjustments or corrections. -
Record Payment
Record the invoice payment. -
Export
Exports the invoice data in CSV format, compatible for import into Xero > Invoices. Useful for syncing records with your accounting platform.
Invoice Preview Features
-
PDF Preview Panel
Instantly displays a formatted PDF version of the invoice, showing all relevant details including branding, line items, taxes, and totals. This mirrors what the recipient will see. -
Select Invoice Template
Users can choose from available invoice templates (e.g., Standard, Detailed, Lease Summary) to customize the layout and styling of the PDF. -
Download Invoice
Click the Download button to export the invoice as a PDF file to your local system. -
Print Invoice
Print directly from the preview screen using the Print button, with formatting optimized for physical copies. -
Email Invoice
Use the Email button to send the invoice PDF to the associated contact’s email address.
Use template selection to tailor invoice formats for different audiences. You can assign a specific template to each contact directly from their record. For help creating custom invoice templates, please contact support.
Invoice Payments
The Payments option allows you to receive, record and manage payment transactions associated with an invoice.
- Receive Payment: Initiate an online payment request, allowing the customer to pay the invoice using supported payment methods.
- Record Payment: Manually log a payment you’ve received outside the system (e.g., cash, bank transfer, cheque) and apply it to the invoice.
How to Receive an Online Payment
Online Payments must be enabled to use this feature. Contact your nestclo administrator to setup payments account. If you require further assistance, contact our support team.
To reive an online payment for a invoice:
-
Open any Approved invoice.
-
Click the Actions button and select Receive Payment. You will be redirected to a secure payment page hosted by Stripe.
-
On the left side, following information will be displayed:
- The invoice number (e.g.,
2023071601) - The amount due (e.g.,
£72.00) - Our business name and branding (
nestclo®)
- The invoice number (e.g.,
-
On the right side, fill in contact payment details:
- Your email address
- Card information (Visa, Mastercard, AMEX, etc.)
- Cardholder name
- Your Country/Region and Postal Code
-
Click the blue Pay button to submit payment.
How to Pay an Invoice from Email
Once online payments are enabled on our platform, paying your invoice is quick and easy — right from your inbox.
Step-by-Step Guide
-
You will receive an email with a PDF invoice attached from our team.
-
Inside the email, click the “Pay Invoice” button.
-
This will take you to our Invoice Preview page, where you can:
- View your invoice details
- Confirm the amount due
- Click the Pay Invoice button to proceed
-
You’ll then be redirected to a secure Stripe-hosted checkout page.
-
On the Stripe payment page, enter your:
- Email address
- Card information (Visa, Mastercard, AMEX, etc.)
- Billing name
- Country/region and Postal Code
-
Click the Pay button to securely complete your transaction.
What Happens After Payment?
Once your payment is successful:
- You’ll see a confirmation message
- We’ll send you a receipt via email
- The invoice will be automatically marked as paid in our system
Payment Security
Payments are processed by Stripe, one of the world’s most trusted and secure payment platforms. We do not store or see any card details.
How to Record a Payment
To record a payment for a invoice:
- Open any Approved invoice.
- Click the Actions button and select Record Payment.
- A Payment Information dialog will appear for you to enter payment details.
- Click Save Payment to confirm and apply the transaction.
- Once the payment information has been saved:
- The Payments tab will display a new payment entry with all recorded details.
- The Balance on the invoice is reduced accordingly.
- If the balance reaches 0, the invoice is marked as Paid.
- You can edit or remove payments if needed.
Fields Overview
You must fill in required fields, marked with a red asterisk (*).
| Attribute | Description |
|---|---|
| Amount Due | Total outstanding amount for the invoice. Automatically filled based on the due amount. |
| Payment Amount | The actual amount you’re paying at this time. |
| Transaction Fee | Optional fee charged for the payment (e.g., bank processing fee). |
| Payment Account | The account (e.g., business bank account) receiving the payment |
| Payment Date | Date when the payment is recorded as made. |
| Payment Reference | A unique reference or memo for tracking the payment (e.g., invoice number). |
Example Scenario
| Field | Example Value |
|---|---|
| Payment Amount | £466.80 |
| Transaction Fee | £0.00 |
| Payment Date | 29/04/2025 |
| Payment Account | HSBC Business |
| Payment Reference | INV2024/11301 |
Best Practices
- Always verify the Payment Method and Account before saving.
- Use unique Payment References to avoid reconciliation errors.
Need more help? Visit FAQs or contact our support team!