Sale Orders
The Sales module allows you to manage customer orders, record shipment, and track invoicing activities efficiently. This guide walks you through the different states of a sales order, key fields, and available user actions.
Sale Order Types
Different types of Sale Orders (SOs) support various business needs. Choosing the correct SO type ensures better tracking, compliance, and financial control. nestclo supports the following two SO types:
Standard Sale Order
A Standard Sale Order is the most commonly used type. It is used for one-time sales where the details—such as items, quantities, prices, and delivery dates—are clearly known at the time of the order.
Use Case Examples:
- A customer ordering 100 units of packaging supplies.
- Selling office furniture to a specific branch.
Key Characteristics:
- Fixed items and quantities
- Single delivery
- One-time invoicing and fulfillment
Standing Sale Order
A Standing Sale Order is designed for recurring sales over a set period, often with variable quantities or delivery schedules. This type of SO reduces administrative overhead by eliminating the need for repeated entry of similar order data.
Use Case Examples:
- Weekly delivery of fresh produce to a restaurant
- Monthly supply of printer paper to an office
Key Characteristics:
- Flexible delivery schedules
- Recurring invoicing
- Often linked to a budget or contract limit
💡 Tip: Standing Sale Orders are ideal for recurring sales from the same customer and are often used in long-term agreements.
Sale Order Lifecycle
The following diagram shows the various stages in the sale order workflow:
Sale Order Status Description
| Status | Description |
|---|---|
| Draft | The order is being created and not yet finalized. Can be edited or deleted. |
| Issued | The order has been finalized and sent to the customer as a reference. Order is ready for fulfillment or procurement. |
| Active | Items have started arriving against the order but are not fully received. |
| Shipped | All ordered items have been shipped. Waiting for invoicing. |
| Invoiced | Customer invoice(s) have been logged against this order. |
| Void | The order has been cancelled and is no longer valid or actionable. |
Dashboard Overview
The Sales Dashboard provides a centralized view of all sale orders in the system. At the top, status tiles display the total number of sale orders in each stage, offering quick insights into your sales pipeline. This dashboard helps streamline sale order management and track progress at a glance.
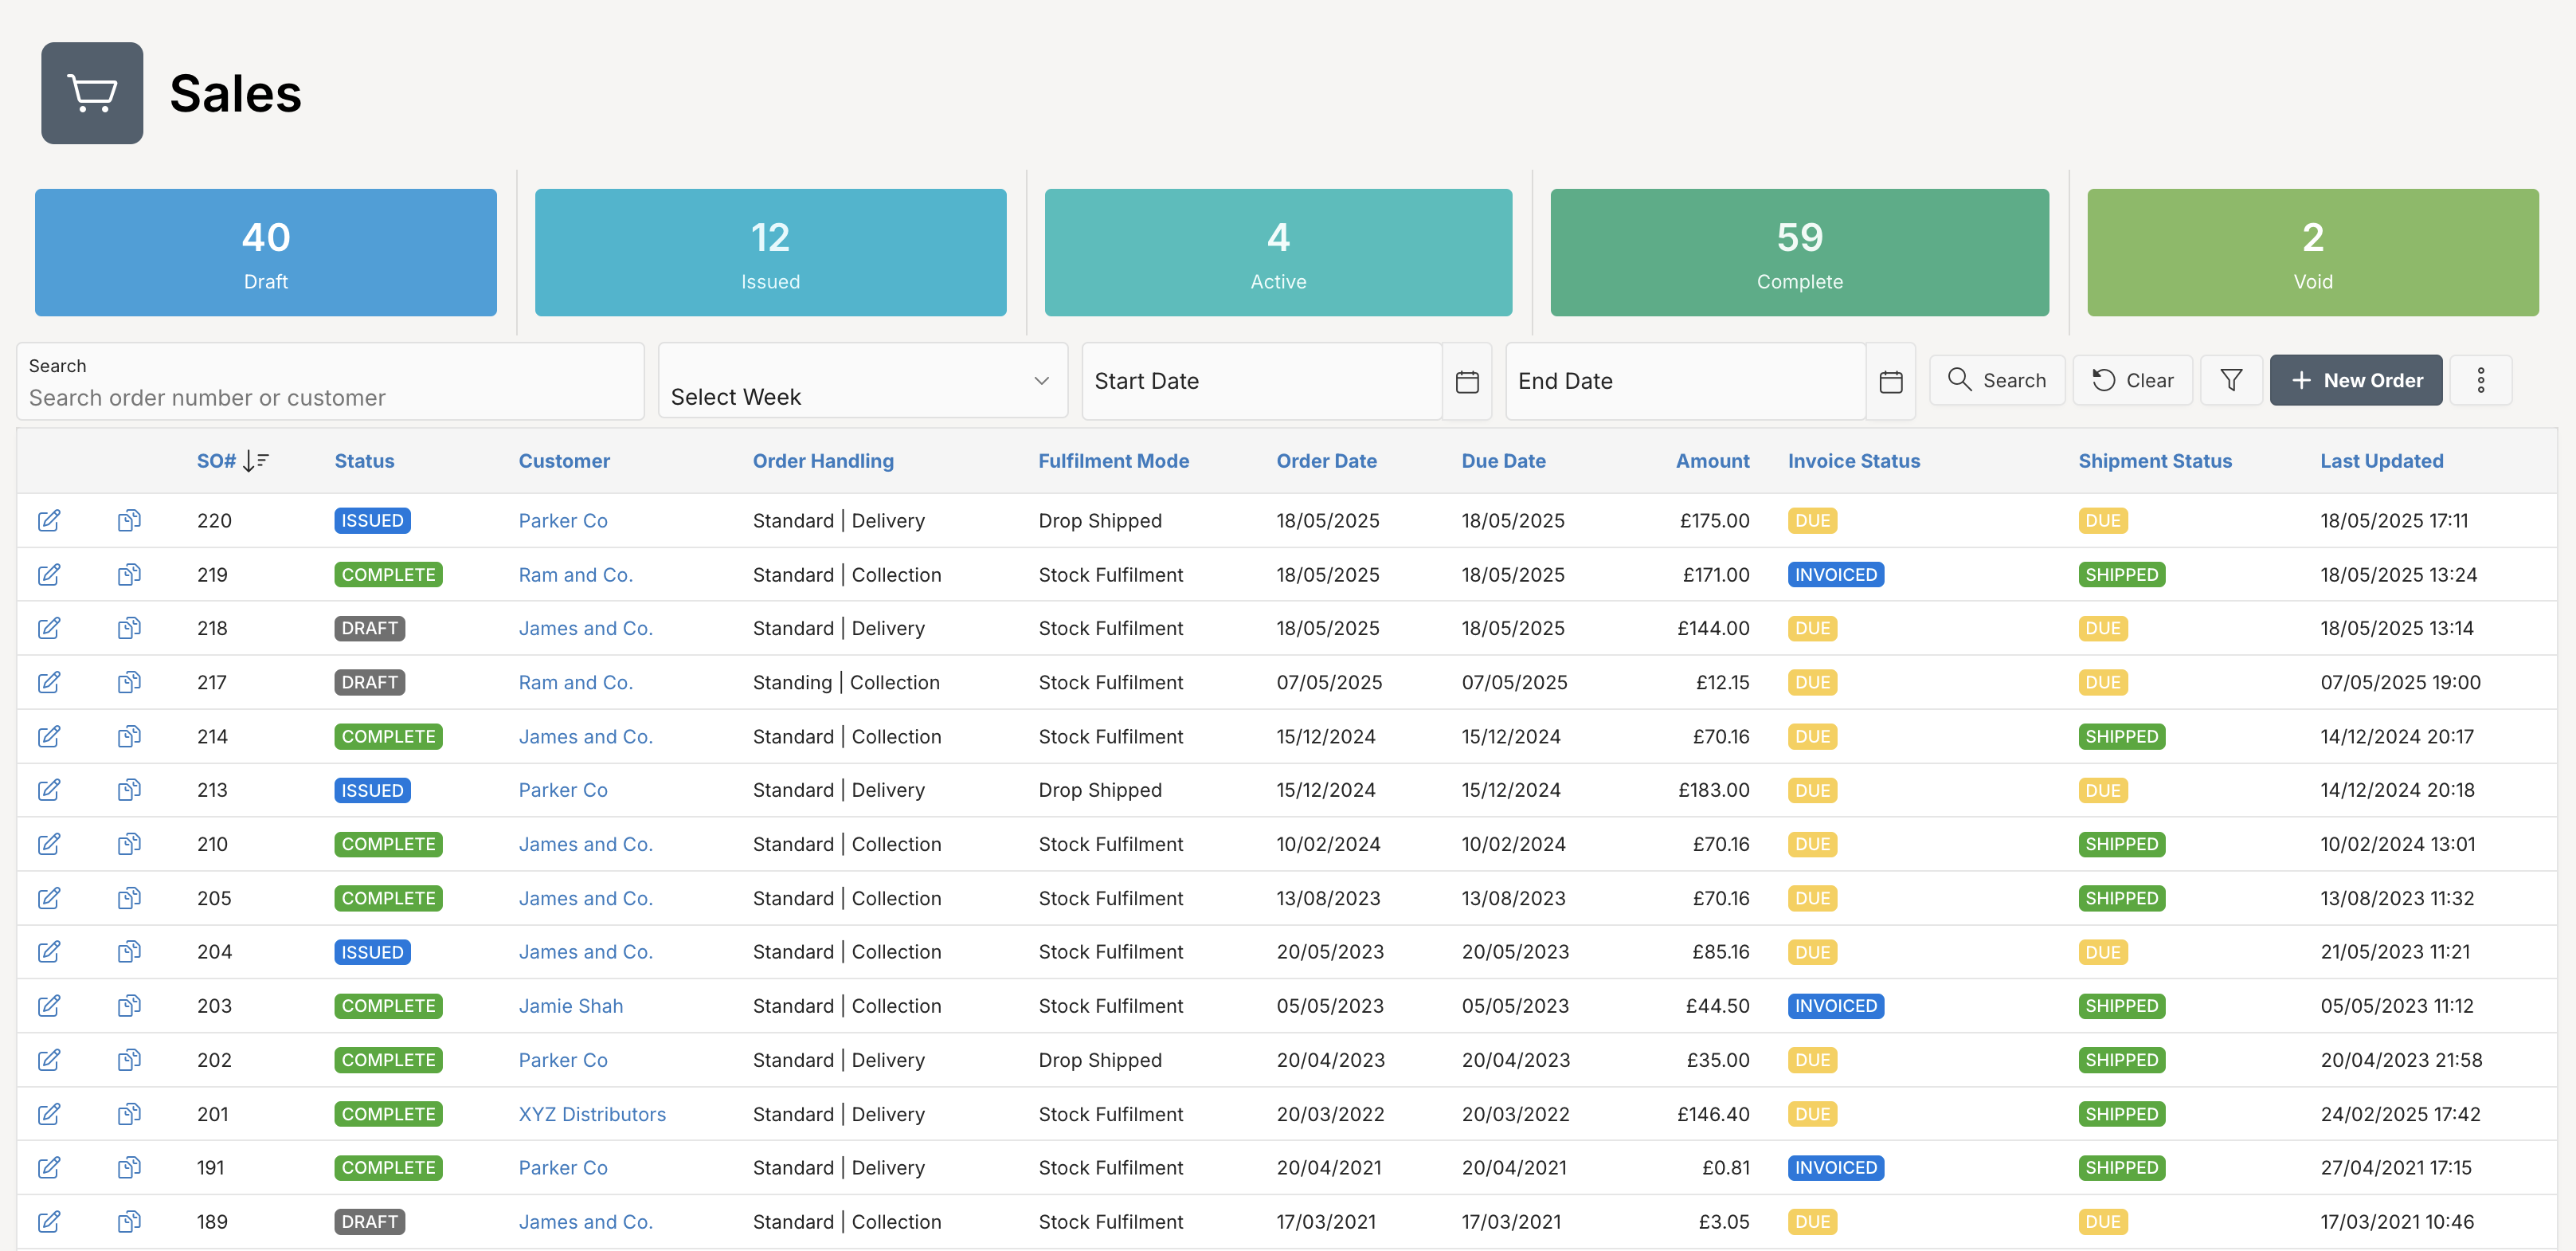
Usage Tips
- Filter Orders: Click a status tile to display Sale Orders matching that status.
- View Orders List: Scroll down to see a detailed list of all orders, including key information such as status, order type, order date, contact, and amount.
- Search Orders: Use the search bar to quickly find orders by customer name, order number, or other keywords. Use week or date ramge filters to search orders for specific period.
- More Filters: Click the button to open a left-side panel to apply additional filters to refine sales order list.
- Create New Order: Click the New Order button to initiate a new sale order.
- Edit Order: Use the icon to edit any order.
- Copy Order: Use the icon to copy any order. The new order will be created in
Draftstatus.
Importing Sale Orders
Import multiple sales orders at once using a CSV file. Follow the steps below to upload your sales orders efficiently.
- Click menu button on the dashboard and select Import option.
- Download the template (
SaleOrdersTemplate.csv). - Populate the template using the required format.
- Enter
Dfor Delivery orCfor Collection in theORDER_MODEcolumn. - Upload the file and configure shipping and warehouse info.
- Enable the Ship Orders toggle, if applicable.
- Click Import to queue the job.
A new job will be created in Scheduler, and orders will appear in Draft status on successful import.
Creating a Sale Order
To add a new Sale Order, click at New Order button. To create or edit a order, you’ll enter the following information:
To create a new sale order:
- Go to Sales from the sidebar.
- Click + New Order.
- Fill in the required details such as Order Type, Customer, Invoice To, Ship To, and line items.
- Add any Additional Charges or Notes for the customer.
- Click Save to save the order as a draft, or Actions → Mark as Issued to send the order.
Fields Overview
You must fill in required fields, marked with a red asterisk (*).
| Attribute | Description |
|---|---|
| Order Type | Choose between Standard or Standing (recurring) order types. |
| Order Date | The date and time the sale order is created. |
| Delivery Date | Expected date and time for delivering goods. |
| Invoice Status | Displays whether the invoice is Due, Invoiced, or Partially Invoiced. |
| Shipment Status | Indicates if the order has been Shipped or is Due. |
| Fulfilment Mode | Specifies whether the order is to be fulfilled by Drop Ship or Ship and Bill. |
| Mode | Delivery method such as Delivery or Collection. |
| Customer | The name and company of the customer. |
| Billing Address | The invoicing address associated with the customer. |
| Shipping Address | The address where goods will be delivered. |
| Order Reference | A reference identifier or note for internal or external tracking. |
| Shipment Preference | Customer’s preferred shipment method (e.g., COURIER). |
| Warehouse | The origin warehouse or store for dispatch. |
| Quote | Linked quotation ID, if the order originated from a quote. |
| Start / End Period | Available in Standing orders to denote recurring service windows. |
| Items | The products included in the order. |
| Quantity / UOM | Quantity and unit of measurement for each item. |
| Unit Price | Price per unit. |
| Tax Rate | Tax applicable to each line item (e.g., No VAT). |
| Tax Amount | Total tax applied. |
| Line Amount | Subtotal for the line (excluding tax). |
| Additional Charges | Additional costs like delivery or disposal. |
| Subtotal / Charges / Tax / Net Amount | Final calculation of total order value. |
| Notes | Optional note or message to customer. |
| Terms and Conditions | Terms associated with the order. |
Shipment
This tab shows details of shipped goods, including any discrepancies or issues with the delivery. It’s crucial for accurate inventory management and invoicing. Click at icon to edit any shipment.
Fields Overview
| Attribute | Description |
|---|---|
| Shipment Date | Date and time the goods were shipped. |
| Status | Indicates the shipment status e.g. Shipping, Packed, Shipped, Delivered |
| Item Name | Name of each item shipped. |
| Quantity Shipped | Number of units physically shipped. |
| Shipment Reference | Reference provided to the customer for the shipment. |
| Batch Reference | Batch or lot number for the shipment. |
| Expiry Date | Expiration date of perishable goods (if applicable). |
Invoices
The Invoices tab in the Sale Order view provides a comprehensive summary of all invoices associated with a specific sale order. This tab becomes available once the sale order status is Complete and invoice status is Invoiced i.e. an invoice has been created.
It allows you to track the invoicing lifecycle and ensures visibility into what has been invoiced to the customer. Each listed invoice includes following financial and status-related information.
Fields Overview
| Attribute | Description |
|---|---|
| Status | Current invoice status (e.g. Draft, Approved, Paid). |
| Invoice# | Unique identifier for the customer’s invoice. |
| Customer | Customer associated with this sale. |
| Due Date | Date by which the payment must be completed. |
| Net Amount | Total invoiced amount excluding tax or discounts. |
| Invoice Date | Date the invoice was issued. |
| Paid Amount | Amount paid against the invoice. |
| Balance | Remaining amount to be paid. |
| Days Overdue | Number of days past the due date (if unpaid). |
| Payment Method | Method used to settle the payment (e.g., BACS, Cash, Cheque, Credit Card, Direct Debit). |
Documents
The Documents tab displays all files uploaded to this order.
To add supporting documents, click Upload Document.
In the upload dialog, you can either drag and drop files or browse to select them manually (Allowed document types - PDF, Word, Excel; max document size 15MB).
Activity
Displays system-generated logs and interactions related to the order lifecycle.
Sale Order Actions
The Actions menu provides quick access to key operations related to the selected order:
| Attribute | Description |
|---|---|
| Preview | The Preview option allows users to view a PDF preview of the selected order before taking further action. This helps ensure the order appears exactly as intended before sending or printing. You can download, email or print the sale order. |
| Copy | The Copy option allows users to copy the order to a new order in Draft status. |
| Edit Order | Opens the order in edit mode, allowing you to modify order details such as items, dates, and amounts. |
| Mark as Issued | Finalizes the draft sale order and changes its status to Issued. Once issued, the order becomes read-only and is ready for fulfilment. |
| Mark as Void | Cancels an already issued sale order. This action prevents any further transactions (shipments or invoices) from being recorded against the order. |
| Delete | Permanently removes the draft sale order from the system. This action is only available for orders in Draft status. |
| Create Purchase Order | Creates a purchase order based on this sale order. This action is only available when order type is Standing and order is in Shipped status. |
| Ship Items or Ship All Items | These options allows user to record shipment. These actions are only available when order type os Standard and order is in Issued or Active status. |
| Create Invoice | Creates a invoice for all items in the sale order that haven’t already been invoiced. This action is only available for orders in Complete status. |
Issue a Sale Order
You can issue a Sale Order (SO) to customers via Email. You can access this option from the Actions menu on the Sale Order screen.
- Navigate to the desired Sale Order in your system.
- Click on Actions > Preview
- A PDF Preview Dialog will appear, displaying the SO in PDF format.
- Review the document and click on Email.
- The SO will be emailed to the customer’s registered email address.
Ensure that the customer has a valid email address registered to avoid delivery failures.
Shipment
The Shipment function is used to record the shipment of goods linked to a Sale Order. This process ensures your stock records are accurate and helps reconcile deliveries against the original order. You can ship items in multiple batches. Partial deliveries are supported and tracked until the full order is fulfilled.
How to Ship Goods
To ship goods, go to Sale Order > Actions and then click Ship Items or Ship All Items. This option is available only when the SO status is either Issued or Active. You’ll enter the following information to capture the delivery summary.
Fields Overview
You must fill in required fields, marked with a red asterisk (*).
| Attribute | Description |
|---|---|
| Shipment Date | Date and time goods were shipped (auto-filled but editable). |
| Status | Indicates the shipment status e.g. Shipping, Packed, Shipped, Delivered |
| Shipment Method | ????? |
| Shipment Reference | Optional reference provided by the delivery party (e.g., invoice, DO #). |
| Warehouse | The warehouse or store for dispatch. |
| Fulfilled By | Field to enter the name of the person who shipped the goods. |
| Notes | Additional remarks regarding the delivery or condition of items. |
Item’s delivery details can be logged in the Shipment Lines section containing following fields:
| Attribute | Description |
|---|---|
| Items | List of ordered items from the SO. |
| Order Quantity | Quantity originally ordered for each item. |
| Shpped Quantity | Amount physically shipped in this session. |
| UOM | Measuring Unit of the item. |
| Batch Reference | Batch or lot ID provided (optional). |
| Expiry Date | Applicable for perishable items to track shelf life. |
Tip: Double-click any field or use the Edit button to update entries.
Create Purchase Order from Sale Order
When managing a sale order, you can directly generate a related purchase order to fulfill the customer’s request. This ensures seamless supply chain coordination from sales to procurement.
This option is available only for Drop Ship Sale Orders i.e. Fulfilment Mode as Drop Ship.
Accessing the Feature
Navigate to any issued Sale Order and click the Actions button, then select Create Purchase Order. A modal titled Purchase Order Information will appear.
Purchase Order Information Fields
Below is a summary of each input field available in the Create Purchase Order dialog:
You must fill in required fields, marked with a red asterisk (*).
| Attribute | Description |
|---|---|
| Supplier | Dropdown list to select a registered supplier. This is a required field. |
| Order Date | Date when the purchase order is created. Defaults to the current date. |
| Billing Address | Dropdown to select or confirm the billing address associated with the order. |
| Order Reference | Optional text field for adding a reference or internal tracking code. |
Note: Ensure that supplier records are pre-configured in your system to populate the dropdown list.
Once all mandatory fields are filled, review the information and click the Create Purchase Order button. The system will generate a corresponding Purchase Order linked to this Sale Order.
Example Workflow - Ship and Bill Fulfilment
In the Ship and Bill fulfilment mode, you are responsible for both shipping the goods and billing the customer. This is the standard process for fulfilling physical product orders from your own inventory.
Example Workflow - Drop Ship Fulfilment
When a Sale Order is placed with Drop Ship as the fulfilment mode, the workflow integrates purchase and sales processes seamlessly, ensuring the customer order is fulfilled directly by the supplier.